Tuesday, May 29, 2012

DIY: "Ceramic Pen" Mug

OK... This is a super easy DIY. All you need is a Sharpie pen/marker and a plain mug... 
{or a patterned mug-up to you}

What you do... Write out a phrase, letter or favorite word on your mug.
Bake your mug at 350 degrees for 30 minutes.
Wha-La! You're finished {told you it was an easy one}!
Perfection on a mug...
I'm showing you a photo of the first one I made {slightly boring}, but the others are for gifts so I don't want to spoil the surprise!!
Not sure yet if this method is dishwasher safe, but I will try it out and let you all know! But you can never go wrong with a gentle "Hand Washing"-HA!

Have a great Tuesday PM

Much Love,
Sarah

Monday, May 28, 2012

Happy Memorial Day

Happy Memorial Day to all you out there in Blogland...
I hope you remember those who have fought and are fighting for our freedom. 
Today I remember both of my grandpas and countless other friends and family members who have given so much to keep our country safe. A HUGE "Thank You" is the least we can do to honor them.
I remember being a little girl and any time I would be out with my parents and we saw a man or woman in uniform, my parents would make me go over to them and say "Thank You". Such a  small gesture, but as an adult I realize what a big impact it still has on me today... All politics aside, I have a huge respect and gratitude to all those who have/are fighting for our nation. 
Sooo... Go thank a soldier and enjoy time with those you love today!
 all pics via pinterest

Much Love,
Sarah

Sunday, May 27, 2012

Ladies Tea

Every May the ladies at my church put on this HUGE event. It's called "Ladies Tea". 
It's a fabulous tea party and great time of mingling and fellowship...
My MIL is on the committee and asked if I would like to help out this year with decorating/whatever they needed. I of course said yes. My college roomie {Mary} also was asked by her MIL to help. We had a great time all morning/afternoon Saturday setting up and making sure everything was picture perfect!
I love this event because I feel it encourages us to celebrate being a woman. We get to dress up and go to a beautifully decorated "Tea Party". It's a great day to be a woman! Ha! 
Here are a few shots I got through the night. I didn't get as many because I had to work that night and get there about an hour late. But it was ok, I still got to have fun and enjoy the evening :)

Mine and Mary's tea cups.
Here I am keeping my pinky up-HA!
I fell in love with these two little people, so stinkin' cute
Roomies re-united. So happy she moved back to CA. 


After clean-up I was able to take these beauties home with me. Love having fresh flowers around!
Have a beautiful Sunday!

That's all for now folks!!

Much Love,
Sarah

Friday, May 25, 2012

Food Friday: No Bake Energy Bites

Good morning dear friends... Did you miss last weeks post? If so, just click HERE!
Anyways... Back to business...
Want a quick pick-me-up breakfast idea? Then you, my friend, have come to the right place!
These taste just like the no-bakes you remember snacking on as a child-but without all the fatty ingredients! I found THIS recipe on Pinterest {AKA my on-line BFF} and just substituted to my liking. Here we go!
So stinkin' tasty...

What you will need:
1 cup dry oatmeal {I used old-fashioned rolled oats}
1 cup toasted coconut flakes
1/2 cup peanut butter {I used a natural kind and it's fantastic}
1/2 cup ground flaxseed or wheat germ
1/2 cup chocolate chips {optional-I used half white half dark}
1/3 cup honey
1 tsp. vanilla
STEP 1: Stir all ingredients together in a medium bowl until thoroughly mixed. 
Before the wet ingredients
All mixed up and should look like this
STEP 2: Let chill in the refrigerator for half an hour. {During this time you can make yourself a cup of coffee/tea and catch up on some blog reading}
STEP 3: Once chilled, roll into balls of whatever size you would like. {I rolled mine into about 1 inch balls} Make sure to store in an airtight container and keep refrigerated for up to 1 week.

STEP 4: ENJOY!!
This treat is fabulous for snacking on a bike-ride or hike, breakfast on the go, or if you are a lover of these like I am, it's good anytime of the day! :)

Here are a few substitutions you could make: 
Your favorite nut butter {almond butter, sunflower seed butter, etc.} for the peanut butter.
And you could also add in some wheat germ in place of some or all of the flaxseed. 
* I would caution, though, against substituting agave nectar for the honey, as the honey’s thickness helps hold things together.
Some other fun substitutions for the chocolate chips {or an addition to them} could include:
chopped dried fruit {apricots, dates, raisins, etc.}
dried berries {cranberries, cherries, etc.}
chopped almonds, pecans, walnuts, or sunflower seeds
other chips {butterscotch, dark chocolate, milk chocolate, white chocolate, M&Ms, etc.}
other grains {different kinds of oatmeal, rice cereal, etc.}

Hope you try these any enjoy them, as much as my hubby and I do!!

Much Love,
Sarah

Sunday, May 20, 2012

Standard of Grace

I. Love. This. Saying.
I'm not one to obsess over all those cliche quotes I see all over Pinterest or in those inspirational message boards {although I DO appreciate them when I'm down}, but I identified with this one...

Happy Sunday all & don't forget to take this to heart for yourself!
Much Love,
Sarah

Saturday, May 19, 2012

Coconut Oil Obsession

Question... Are any of you into coconut oil?
I have recently gotten into it. I LOVE it and you can use it for everything! It is amazing in just about every area of your life {literally-every!}. I found THIS website that tells you 160 ways to use coconut oil. 
WOW... 160!!
I can't wait to try them all. This morning I put it on my toast for breakfast with a dab of my Grandma's famous jam on top {thanks for the tip Anna}. It was FANTASTIC! :) You all should try it. I bought mine at Trader Joe's for about five dollars. It comes in a pretty good sized jar. You will thank me after you've used it for the first time. You can substitute it for the oil in most recipes {especially baked goods}. I am still experimenting with this one. So... Needless to say... I {heart} coconut oil!

Here are just a few reasons why I am personally wanting to incorporate coconut oil into my daily living:
1. Cancer {has been shown to prevent colon and breast cancer in laboratory tests}
2. Energy boost
3. Immune System Builder
4.Mental Clarity
5. Stress Relief 
and SOOO much more...

Here are a few new things I want to try with it!
1.Face Wash/ Soap 
2.Chapstick
3.Moisturizer 
4.Body Scrub
5.Toothpaste

Coconut Oil Is:
Anti-bacterial {kills bacteria that cause ulcers, throat infections, urinary tract infections, gum diseases, and other bacterial infections}
Anti-carcinogenic{coconut oil has antimicrobial properties so it effectively prevents the spread of cancer cells and enhances the immune system}
Anti-fungal {kills fungi and yeast that lead to infection}
Anti-inflammatory {appears to have a direct effect in suppressing inflammation and repairing tissue, and it may also contribute by inhibiting harmful intestinal microorganisms that cause chronic inflammation.}
Anti-microbial/Infection Fighting {the medium-chain fatty acids and monoglycerides found in coconut oil are the same as those in human mother’s milk, and they have extraordinary antimicrobial properties. By disrupting the lipid structures of microbes, they inactivate them. About half of coconut oil consists of lauric acid. Lauric acid, its metabolite monolaurin and other fatty acids in coconut oil are known to protect against infection from bacteria, viruses, yeast, fungi and parasites. While not having any negative effect on beneficial gut bacteria, coconut oil inactivates undesirable microbes.}
An Antioxidant {protects against free-radical formation and damage}
Anti-parasitic {fights to rid the body of tapeworms, lice and other parasites}
Anti-protozoa {kills giardia, a common protozoan infection of the gut}
Anti-viral {kills viruses that cause influenza, herpes, measles, hepatitis C, SARS, AIDS, and other viruses}
Infection fighting
Has no harmful for discomforting side effects
Known to improve nutrient absorption {easily digestible; makes vitamins and minerals more available to the body}
Nontoxic to humans and animals

Much Love,
Sarah
P.S. I was not paid by anyone to write this post! Ha! I just love and believe in this natural product! 

Friday, May 18, 2012

Food Friday: Quesadillas

Good morning lovely friends. Did you miss last times Food Friday? If so click HERE to get the recipe for my wonderful Taco Cups. On to today's Food Friday...
I am going to let you in on a wonderful secret. Hubby and I make quesadillas like 2 or 3 times a week for lunch! They are in no way "authentic" but they are down right amazing. Brian makes the best ones you will ever taste {even with ground turkey}! "Ground turkey" you may say? 
IT. IS. SO. GOOD.
Try this easy way of making them! You will not be disappointed!
All you need is:
Quesadilla maker {we got ours for a wedding gift {thanks AMY}, Target also sells them for around $20.00}
Seasoned Ground Turkey
Mexican Cheese
Whole Wheat Tortillas

Here is a photo of the tortillas I use and the quesadilla maker we have.

STEP 1: Brown your turkey and add seasoning to your liking. 

STEP 2: Put together your quesadilla like so. Layering tortilla, cheese, meat then sprinkle on top more cheese.
STEP 3: Set your prepared quesadilla onto warmed quesadilla maker. Place second tortilla on top. Close lid of quesadilla maker and let "cook" until light turns green. Check on your quesadilla, the top should be lightly browned as so... 
STEP 4: Carefully remove quesadilla from maker and place onto plate {we use a knife to help ease the HOT quesadilla off}. We like to add fresh salsa to the center to add some spice! Yummy... {I use mild and hubby uses medium-these salsa's are SO GREAT!} 
STEP 5: Add your sides. We always pair with chips and salsa. We can't get enough of these chips! They are divine... :)
Don't judge us... but on this particular day Brian and I were both home for lunch and we vegged in front of the tele and watched something on Netflix! Ha! 

There ya have it folks-perfection in a quesadilla! Go try one today! You will love it!

Much Love,
Sarah

Thursday, May 17, 2012

Beautiful Thursday

Happy Thursday Loves!
I'm in the mood for some pretties. I'll share some current swoons I found on Pinterest.
 Gorgeousness found HERE
I LOVE this style! Source unknown
Would you be daring enough to ever wear something like this? Source unknown
Smells delightful! Found HERE

Have a fab one!

Much Love,
Sarah

Wednesday, May 16, 2012

Choosing Joy

Today, I uploaded a bunch of photos from my Iphone to my computer. 
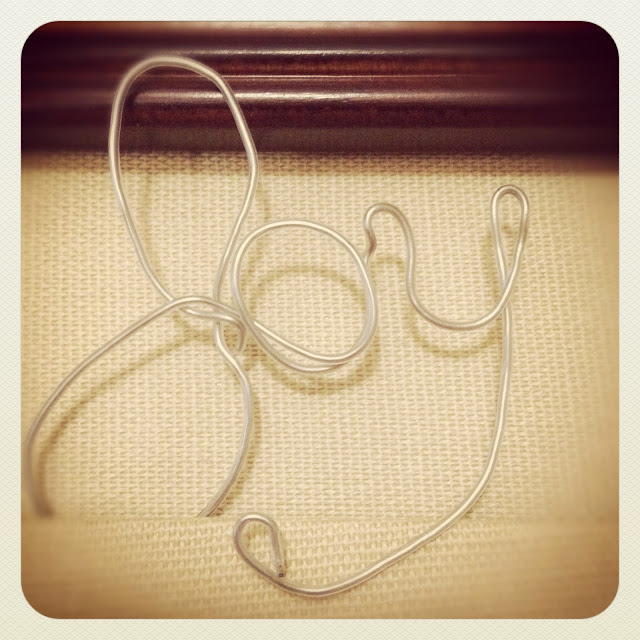
I came across this photo I took the other day for the "May Photo a Day" challenge. It stuck out... 
I began thinking of the meaning of this word. 
I made this "JOY" word out of wire a little over a year ago. I found it a few months ago in a craft box and put it on a linen message board I have by the front door. I chose this particular spot because it is a place I look at daily... I thought it would stick out to me and I would remember to live a happy and joyous life. Each day living in the Joy that the Lord has given to me. 
Well... Somewhere along the line of the hustle and bustle of life and daily business this word got covered by bills, letters, stamp packets and so much more. When I cleaned off the board the other day, it happened to be the day in the photo challenge where you picked a "word you love". I love this word. In a way it instantly convicted me. Where was my joy? Was I living in it? Or was I letting the heaviness of daily stresses get me down and in a funk? I realized quickly that I was not living in joy.
J.O.Y. 
Simple three letter word.
I am reminded today and every day from now on out to live in the Joy that my Heavenly Father has given me. Daily reading my Bible and gaining all I can from it's wisdom. Not letting the small stuff bother me. Loving freely and laughing often just as the quote goes. Being quick to forgive and showing my Joy to everyone I meet... Will you do the same today? I hope you join me in this new challenge.

Much Love,
Sarah

Tuesday, May 15, 2012

Pantry Organization

I forgot to post this picture of my newly arranged "pantry". Here is where I put all my day-to-day food items. I have another cupboard I place most of my baking needs and canned goods. Living in an apartment and having apartment storage space sure makes you a good organizer! Ha!
 Here is what I had shoved on just one shelf! Ugh! I can't stand dis-organization! 

Ahhh... I can sleep easy tonight... 

Much Love,
Sarah

Long Time, No See and a Wedding

Soooo... It has been FOREVER since I last posted!!! Ahhh!!
I have been crazy busy over here. I went to the East Coast and got home a little over a week ago and I've been going non-stop ever since. Today was my first day off work and I've been spending the day cleaning up "shop" so to speak. I finally unpacked my suitcase {poor hubby's biggest pet-peeve} and so much more. I deep cleaned my pantry and fridge! Major bonus points for moi... Spent a little time with the hubby... And even managed to vacuum the floors. :) I now have a happy hubby! Ha!
Over the next week, I will be posting my pictures from Maryland and New York. I warn you ahead of time, it will be photo overload! You all don't mind, do you?!? Ok cool, I didn't think so! 
So I will leave you with these lovely photos of my sis in-laws wedding this past Saturday. It was a sweet and intimate ceremony in San Francisco right on the beach {fabulous spot}. The backdrop was a gorgeous view of the bridge. Congrats Richard and Michelle, we love you! 
4 sisters. Bride and hubby. Beautiful Bride and I.
My handsome nephew Ethan.
Hubby & I {Dear Lord, he is so HOTT}.

Have a fabulous evening!

Much Love,
Sarah

Saturday, May 5, 2012

DIY: Birthday Invitations

Sooo... It's officially my birthday month! Anyone who knows me well knows that I LOVE my birthday! It's so much fun that I celebrate it all month with special emphasis on the week of my birthday. Ha!
Ever since I was little, my mom has always made a BIG deal about each of us kids' birthdays. We had AMAZING parties with whatever theme we wanted and she would go all out. As I got a little older, I went through this phase where I would be embarrassed at this for some reason {sorry mom} and wanted smaller and simpler parties. 
Example: Chuck E. Cheese's parties or one year I picked my two besties to go to Great America for an all expense paid day of fun. 
Although I'm not living with my parents anymore and my mom isn't here to spoil me rotten, I've adapted this love for parties again. Last year, I had an amazing birthday party. I loved it. I had sort of a "vintage, light pink" theme and had family and friends came to celebrate with me. We had a blast! Anyways, back to the DIY part of this post. I'm going to show you how I made the invites to my party! Sorry if in a few parts it looks awkward, I faded where the personal info was since this party was not at my own home. Enjoy!

Here is my finished invite. I just loved how they turned out. Who doesn’t go gaga for ruffles? {Not me!}

What you will need:
1. Paper of choice 
2. Tissue paper
3. Scissors
4. Sewing machine
5. Small flower or jewel

STEP ONE: Get together your paper {I went to Joanne’s and bought 12×12 scrapbooking paper} and scissors. Cut out the size cards you want. I cut 5×7 cards. 
You should now have your cards cut out!

STEP TWO: Print your invitations.

STEP THREE: Take your tissue paper and cute into about 2 inch strips. Now accordion-style fold it all the way down. 
You should now have this… Your “ruffle”.

STEP FOUR: Cut sides of “ruffle” down to the size you want. I did about 1.5 inches. You don’t want your ruffle to be too big as it would take over your invite! Lay out your ruffle on your invite to eyeball how big it should be. Now sew your ruffle onto your invitation. 


STEP FIVE: All you have to do now is place a small flower, gem or whatever creative thing you can think of on the bottom of your ruffle. 


STEP SIX: Relax, you just made a beautiful invitation! Congrats!

Hope you enjoyed this tutorial!!

Much Love, 
Sarah